Wednesday, 15 April 2020

How to Survive Your First Recession (or Any Other Disaster) as a Freelance Copywriter

While the world at large is discovering Zoom and hoarding toilet paper, I am celebrating a milestone in my freelance copywriting business.

No, it wasn’t hitting the six-figure mark.

And no, I didn’t score an interview on an episode of MarieTV. At least yet.

It’s that I received the following email from a client in response to the COVID-19 outbreak around the world….

And I turned down the offer.

Before you type out a “WHY DIDN’T YOU TAKE THE OFFER TO GET PAID EARLY” comment, let me be clear…

I am grateful that after years of hard work, I attract clients who give a eff about their freelancers.

But I prepared my business for moments like this.

Did I predict that a pandemic would single-handedly destroy the world economy in a few weeks? Not necessarily.

But thanks to a decade of work as a disaster policy researcher and emergency manager, I know there’s a way to plan for a recession, pandemic or anything else that could put you out of business.

So I made the most of my social distancing time and broke it down for you – step by step.

By the time you finish this article, you’ll learn…

  • Why government officials don’t know a thing about running a business (let alone preparing them)
  • What the world’s greatest copywriting formula can teach you about emergency planning
  • The 5 types of emergency scenarios your business should be thinking about

So turn off Netflix, grab a cup of coffee or tea, and let’s get started.

Why government officials don’t know a thing about running a business (let alone preparing them)

Here’s the truth:

Most government workers advising businesses on emergency planning don’t have a clue what it means to run a business.

And when I say “most”, I mean me. Back then, at least.

Why would I? I had a 50 hour work week, $0 deductible health insurance (Good luck finding that as a freelancer), and a pension plan. So when I gave up my cushy government job to become a freelance copywriter, I found myself imagining all the things that could go wrong with my new career.

Like what happens if I have no clients for months on end?

What if I lose our Internet connection right before an important presentation?

Or what if I (gulp) expose myself to a killer virus with no known cure?

So I went back to my own experience as an emergency manager. What exactly did I tell business owners when they asked for advice on how to get prepared?

First, I would have scheduled an hour-long presentation and showed a video similar to this

View in FEMA Multimedia Library

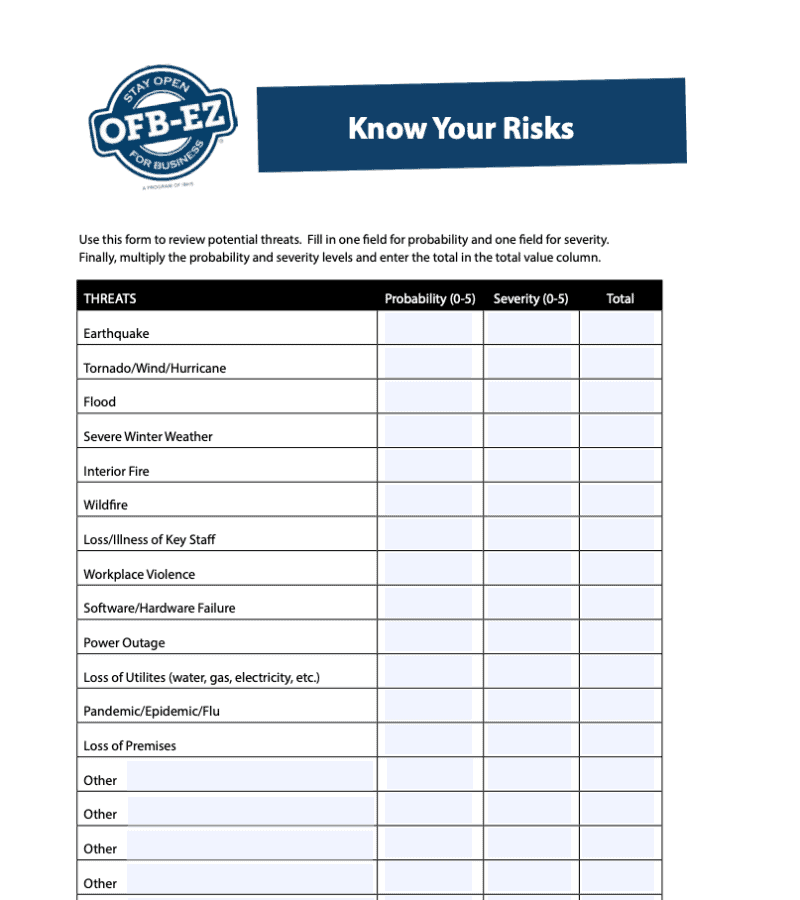
Then I would send them to a website with worksheets like the one on Knowing Your Risks below…
And assuming that these 2 things didn’t bore the living daylights out of them, I might send over the following business continuity planning diagram from Ready.gov.Source: Ready.gov

Did I do my duty as an emergency manager? Sure.

Did this help business owners protect themselves from an emergency? Probably, but who has the time to do it all? We’re called “small businesses” for a reason.

So forget I showed you any of that, and let’s talk about what you can do to get your business prepared, using a copywriting formula you may be familiar with.

What Problem, Agitation, Solution Can Teach You About Emergency Planning

If you’ve ever written a single line of copy, you should know that the world’s greatest copywriting formula is Problem, Agitation, Solution (P.A.S.).

Why does P.A.S. work so well? Because it’s simple, it’s effective, and it takes the reader seamlessly through the stages of awareness.

And emergency managers do the same thing to practice their emergency plans. We just call it a tabletop exercise.

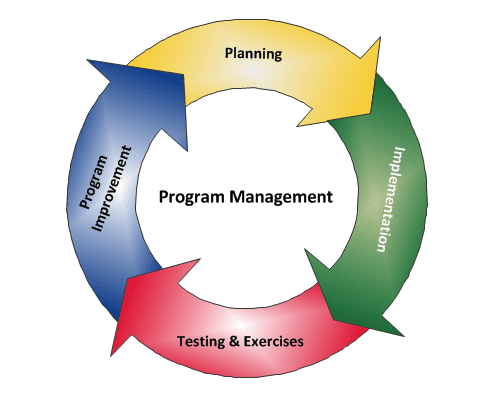
For emergency management newbies (Which is probably 99% of you because you’re reading a copywriting blog), here are 4 phases of running an emergency preparedness program:

  1. Planning,
  2. Implementation,
  3. Testing & Exercise, and
  4. Program Improvement.

Source: Ready.gov

Planning is more or less writing all the procedures of what you would do if a disaster happens and putting in a giant 3-ring binder…

Testing & Exercise is what happens when the entity (in this case, your business) goes through the mental or physical process of seeing if what you wrote down as a procedure works for a specific scenario.

So once you Plan, you Implement what you wrote down, run through a Test or Exercise, and then do Program Improvement as a result of the Test or Exercise.

Anyway, within Testing & Exercises are various types of drills you can do within an emergency management program, and the one you need to know about is called a tabletop exercise.

A tabletop exercise is one of the lowest-touch exercises to pull off because all it takes is a select group of people, a few hours and a conversation centered around a scenario or two.

It works because you verbally or mentally walk through a Problem, Agitation, and Solution…

And you can do it without, errr… physically recreating an emergency…

Or experiencing a real emergency first-hand.

twister

Now that you understand what a tabletop exercise is let me walk you through 5 emergency scenarios that could affect your freelance copywriting business.

The emergency scenarios are:

  1. You can’t work for an extended period
  2. The physical place you work is malfunctioning or uninhabitable
  3. External threats to your business assets
  4. You are under government order to stay where you are
  5. You lose work or can’t find work due to economic conditions

I’ll give you a specific example of each and break it down using the Problem, Agitation, Solution formula.

ONE: You can’t work for an extended period

Something like: A chronic disease diagnosis or a heavy body injury (Like getting into a car accident).

Problem

You’re feeling tired and burnt out from serving clients, writing a book, and pursuing a graduate degree. You decide to take some time off to do self-care and schedule that yearly checkup you’ve been putting off for the last 15 years.

You notice something’s off with your body and let your doctor know, who orders a scan “just to be safe,” but thinks you’re fine. Which you are. Phew.

Agitation

3 months later, you go back in for another scan “just to be safe,” and what was “fine” 3 months ago is a tumor. So you go back for surgery to remove the growth. And then do another 9-hour surgery so tumors don’t come back.

The surgery went fine, but the doctors also think you might have bladder cancer too.

Oh, did I mention that your dad died in a car wreck a few weeks ago?

Solution

Note that this isn’t a B.S. scenario; this was my husband’s life in 2015. He’s been cancer-free since 2016. I won’t bore you with the details of his recovery, but I will leave you with this photo of us before his 9-hour surgery.
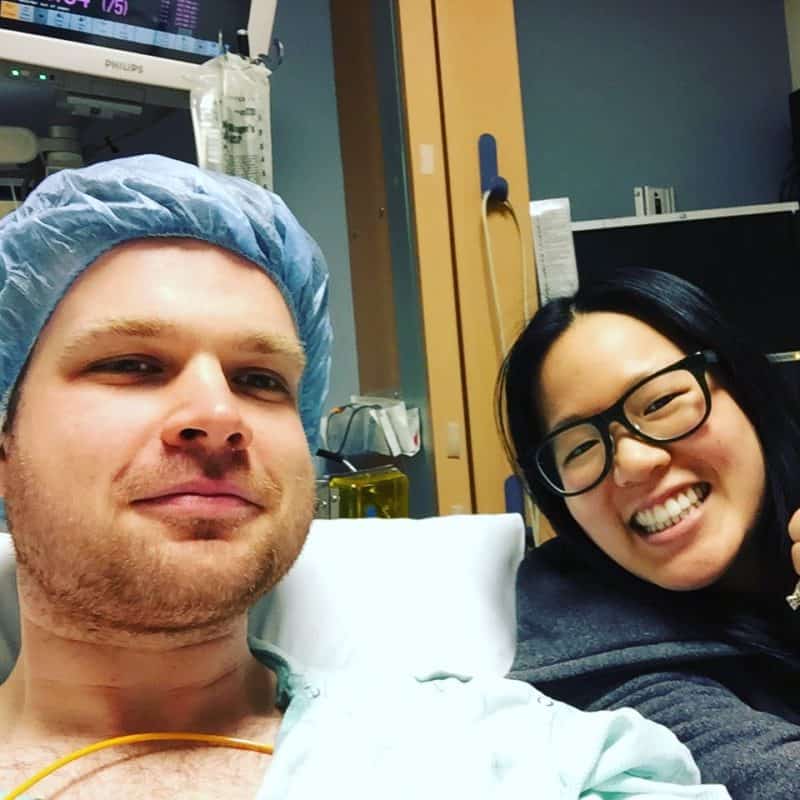
Assuming this hasn’t happened to you, let me take you through my thought process of planning for the possibility of cancer relapse. Ultimately, it came down to 3 things…

1. Really good health insurance

If you’re a freelancer, health insurance sucks. It’s even worse when you’re dealing with a chronic disease that requires regular lab work and tests.

So I focused on changing our business structure to qualify for a group health insurance plan. It’s almost (but not quite) as good as what I had as a full-time employee.

2. Long-term disability insurance

We decided against purchasing long-term disability insurance but it’s worth mentioning. Buying a long-term disability policy can give you up to 90 days worth of wages if you can’t work for whatever reason.

3. Life insurance

We also decided against this. Life insurance doesn’t make sense if you have a pre-existing health condition, but it’s worth some research if you’re a healthy individual and want to make sure your family is taken care of if something happens to you.

To sum it all up

Based on my personal experience, preparing for this scenario is all about figuring out how you can cover costs if you can’t earn income for an extended period.

If buying insurance is difficult or not an option, you could sub all of these things by having an emergency fund.

TWO: The physical place you conduct your work is malfunctioning or uninhabitable

Something like: A power outage, fire, hurricane, tornado, earthquake.

Problem

It’s a cold winter day, and the weather forecast is predicting the biggest snowstorm in 15 years. Meteorologists are recommending that people stay off the highways and work from home.

You live on a giant hill and don’t own an all-wheel-drive vehicle, so you’re most likely stuck inside your house anyway when the storm hits. Luckily, you’re a freelancer. Your commute is down the stairs and to the right.

Agitation

Except your power is known to be a problem, especially in the winter. About an hour before you’re about to give an important copy presentation, the lights start flickering and BOOM, your power is out.

Meaning? Your Internet is out—no Zoom call for you today.

Solution

Note: This exact situation hasn’t happened to me yet, but I know it’s coming considering my power goes out all. the. time.

So what would I do?

1. Keep an eye on the weather

Simple enough, right? You can do this by watching the local news, using a mobile app, or listening to an all-hazards radio if the power is already out. I like to go to the source and read National Weather Service alerts.

2. Have a backup mode of communication with my clients (and another backup to the backup)

If I think that the weather is going to be a problem, I reach out to my clients in advance to figure out an alternative mode of communication.
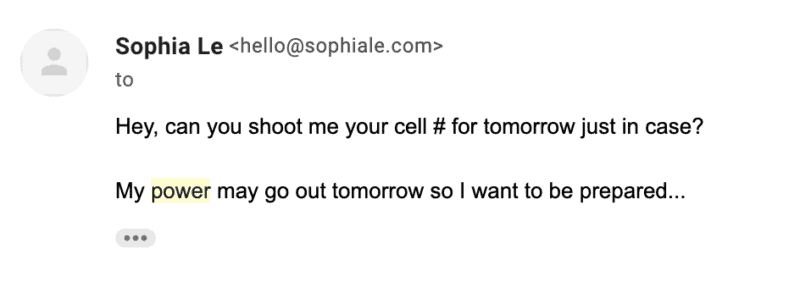
To make sure my cell phone doesn’t lose power, I keep it on the charger AND make sure I have a battery pack charged in case the call runs long.

3. Buy a generator

In this scenario, the power may be out…but the Internet likely isn’t.

So my husband and I finally took the plunge and bought a generator to run the electrical circuits to our router during a power outage.

I don’t recommend doing this unless you have a family member or friend who knows something about wiring electricity, but it’s worth mentioning.

To sum it up

Hazards like snowstorms, hurricanes, tornadoes, and earthquakes are going to happen… but it’s ultimately up to you to control how they affect your business.

In general, this scenario is all about staying aware of what’s going on with where you live and making sure you have a backup plan if your Internet, power, or software tools stop working.

THREE: There is an external threat to your business’s money or assets

Something like: Equipment theft, an IRS tax audit, or a business deal goes south.

Problem

You’re an aspiring copywriter who wants to get a few clients under your belt. After creating a profile on Upwork, you score your first gig with an agency! You’re excited to start…but the contract they sent over is full of typos.

Agitation

To make sure you’re doing the right thing, you ask a close friend to look over the contract. Meanwhile, the agency needs to run a background check and asks you to scan in your driver’s license and your social security card.

When your friend Googles the agency, they find reviews of people who say there’s no work available, and it’s all a scam to steal your identity. You immediately stop contact…but they already have your information.

Solution

A friend of mine went through this situation when she was looking for temp work after finishing graduate school. Luckily she never got as far as giving out her social security number, but what if she had?

Here’s what I’d do if this happened to me…

1. Turn on credit monitoring

You can do a lot with a driver’s license and a social security number, so I’d personally be on the lookout for whether new credit card accounts get opened in your name.

2. Change your passwords

Did you know that an email address and password are only worth about $2.30 on the dark web? So basically, if a cybercriminal has some of your personal identifying information (Like a driver’s license or a social security number), they can pay someone for the other data needed to go on a major shopping spree.

Source: Keeper Security

In general, it’s not a bad idea to check that all your online accounts all have unique, hard-to-guess passwords. I like to keep mine in a password safe like 1Password.

3. Get a really good lawyer

It’s nice when your friends are willing to read over your business contracts, but it’s nicer when that friend happens to be a lawyer.

Why? Because they know what red flags to look for. I’ll never forget what a friend once told me about using a lawyer to review contracts…

It’s not that I don’t trust [them]. It’s that I don’t want to trust [them].

For more on picking out a lawyer for your business, check out these Copywriter Club podcast episodes with legal experts Christina Scalera and Danielle Liss.

To sum this up

The work we do as freelancers on the Internet makes us highly susceptible to cybercrime like this scenario. Therefore, it’s worthwhile to take a look at what you’re doing to make sure your information (and your clients’ information) is secure.

I like this checklist from Techlore if you’re looking for ideas on how to protect your business.

FOUR: You are under government order to stay where you are

Something like: An active shooter event, terrorist event, biological agent attack or pandemic.

(AKA everything you wish you’d known a month ago.)

Problem

A few dozen elderly patients at a long-term care facility 5 miles from your house develop symptoms of a new flu-like virus with no known cure.

You’re concerned and make a point to avoid running errands in the area, but it doesn’t necessarily affect your business since you have clients from all around the world.

Agitation

The local school district shuts down after officials discover that students from some of the high schools regularly volunteer at the same long-term care facility. Because it’s not clear how the virus spreads, they switch all their students to telelearning.

All of a sudden, you’re not just juggling client work – you’re now homeschooling your kids. Also weirdly enough, there’s no toilet paper to be found anywhere.

Solution

I do live 5 miles away from THE long-term care facility in Washington state, but luckily, my daughter is only a year old, meaning her “curriculum” is more songs and fingerplays.

Which is already overwhelming. So imagine if she had real school. With classes and homework.

Here’s what I’d do…

1. Outsource whatever you can

You still need to do the stuff that makes your household run. So let Instacart deal with finding toilet paper, yeast, or whatever else people are stockpiling.

Plus, you’re giving work to people who need it right now. Just make sure to set up a sanitization station.

2. Block your calendar

I’m complete crap at this, so I’ll defer to the experts: Jo herself and this awesome webinar Nikki Elbaz put together.

3. Stay as healthy as possible

This is a pandemic, people. Meaning that even if you don’t have the killer virus, you want to avoid going to the emergency room.

So take your vitamins. Stock up on over-the-counter medications like Tylenol and Benadryl. Learn some basic first aid. Basically, do whatever you can to avoid physically going to the doctor.

To sum it all up

Pandemics are hard to take seriously because they only happen every hundred years. You can’t see them, and nothing can be done to prevent the spread of disease beyond washing your hands a ton and avoiding close contact with people.

However.

The benefit of a pandemic is that there is advance notice, so it’s never a bad idea to stay updated on the news around the world and prepare for a “stay at home” scenario by stocking up on extra food, water, and other supplies.

As for the sudden switch to telemedicine and K-12 distance learning…never in a million years would I have written that into a tabletop exercise. Well played, COVID-19.

Scenario #5: You lose work or can’t land work due to economic conditions

Something like: Economic recession, deflation, or inflation

Again, we have real-life to draw inspiration from!

Problem

A killer virus with no known cure infects hundreds of thousands of people around the world, putting all financial markets around the world into a recession.

You’re concerned, but you’ve positioned yourself as an industry expert and have delivered great wins for your clients. But now you’re not sure if it’s the right time to raise your rates.

Agitation

Your long-time client sends you a Slack message, asking you to meet outside your regularly scheduled time. You later find out that their major investors have pulled out, meaning they can no longer afford your services.

Solution

I hate to be the pessimist here, but this could happen to any of us in the next coming weeks.

Read on for some ideas on what you can do to keep your business afloat.

1. Expand your niche

Remember all that advice about finding your niche? It works like crazy during a period of economic prosperity…but it might not work as well if the industry you picked is crumbling as we speak.

So think outside the box. What other experiences can you draw from that could help people right now? Do your current clients need additional services beyond copywriting?

It’s not an ideal situation, but it’s something that could help you pay the bills IF you needed it.

2. Go through every business expense and ask yourself, “Do I need this?”

Yeah, I know it’s boring. But every transaction matters right now. If your boat were sinking, you’d start throwing non-essential items overboard. The same goes for your business.

You can import your transactions into a tool like Mint or Quicken for further analysis. But honestly, I prefer to print out my bank and credit card statements and go through them with a highlighter.

Source: NORTHFOLK on Unsplash

3. Apply for financial assistance with the Small Business Association (SBA)

If all else fails and you need to cover payroll or other expenses sooner than later, the Small Business Association can help. Some of them are grants; some of them are loans.

Obviously, read the fine print. If your business strapped for cash, there is no shame in asking for help. That’s what the government does best in an emergency.

Now it’s your turn

You and I could come up with scenarios all day even worse than reality (Zombies, anyone?). Still, it doesn’t change the fact that as a copywriter, you already have the skills you need to survive your first recession, pandemic, or any other disaster that could put you out of business.

By simply using the Problem, Agitation, Solution formula, you can walk through almost any situation and figure out ways you might prepare or respond to them.

Again, the 5 types of emergency scenarios are…

  1. You can’t work for an extended period
  2. The physical place you work is malfunctioning or uninhabitable
  3. External threats to your business assets
  4. You are under government order to stay where you are
  5. You lose work or can’t find work due to economic conditions

And if you’re still not convinced this exercise is worth the time, keep in mind that 40-60% of businesses never reopen after a disaster.

Besides time, what do you have to lose – especially if it could prevent your career as a freelance copywriter from becoming part of a statistic?

Give it a try, come up with your own scenarios, and let me know what you think.

Stay safe,

Sophia

P.S. Struggling to figure out what you actually need to get your business prepared for an emergency? I’m working on a checklist for you. Sign up here to get notified when it’s live.

The post How to Survive Your First Recession (or Any Other Disaster) as a Freelance Copywriter appeared first on Copywriting for startups and marketers.


from
https://copyhackers.com/2020/04/how-to-survive-your-first-recession-or-any-other-disaster-as-a-freelance-copywriter/

Tuesday, 4 February 2020

How to spot bad headlines before they make your visitors bounce – an intro to easy copy validation

User testing tools aren’t just for user testing experts.

In fact, five-second tests offer a quick, easy and (relatively) cheap way for copywriters and digital marketers to run quick checks on their copy (“copy validation”).

Most of us know we need to use data to help us know what to write. But you should also use data to help you spot if you hit or missed the mark.

That’s where copy validation comes in. When you validate your copy, you boost confidence in your work knowing that it’s making a great first impression – long before your client ever reacts to it.

Time (as well as this study) says we have as little as one-tenth of a second to make a good impression.

Psychology Today and Business Insider say we have about 7 seconds.

We see a face. We form a first impression. It’s human instinct.

Unsurprisingly, that first impression is largely emotional. And a recent study by neuroscientists regarding how our brain forms a first impression confirmed through neuroimaging that the amygdala and the posterior cingulate cortex (PCC) are key regions of the brain involved in that process. And if you’re not someone who throws “amygdala” or “PCC” around in conversation, let me nutshell this for you: both do a lot of heavy lifting in processing emotions.

brain regions

(Source: Kurniasanti, Kristiana Siste, et al. “Brain Regions,” licensed under CC BY-NC 4.0Medical Journal of Indonesia, 2019.)

robina weermeijer 3KGF9R 0oHs unsplash

(Source: Photo by Robina Weermeijer on Unsplash)

And the amygdala? Well it’s hailed as the integrative center for emotions, emotional behavior and motivation.

But breaking down the emotions behind a first impression is a little more complex:

A recent study at Princeton University by Janine Willis and Alexander Todorov involved a series of experiments focusing on judgments formed during a first impression drawn from a face. Those judgments were:

  1. Attractiveness
  2. Likeability
  3. Competence
  4. Trustworthiness
  5. Aggressiveness

So participants looked at a picture like this:

the new york public library 8Swf0oaXUrk unsplash

And then judged it on those five criteria above.

Interestingly, only 1 of those 5 judgments actually has anything to do with facial appearance: attractiveness.

Willis and Todorov’s methodology was as follows:

  1. Participants were told that this was a study about first impressions and that they should make their decisions as quickly as possible
  2. The instructions explained that photographs would be shown for short periods of time and that the experimenters were interested in participants’ gut reactions
  3. Participants were asked a yes/no judgment question – for example “Is this person trustworthy?”
  4. Following this yes/no judgment, the next screen asked participants to rate their confidence level in their judgment

They found that increasing exposure time from 100 to 500 ms increased confidence in the participants’ judgments. But that increase in exposure did not change their initial judgment. In fact, they found that the judgments formed after just 100 ms of exposure corresponded with judgments made in the absence of any time limits.

Or put simply:

First impressions are sticky.

Lizard brain strikes again.

2 lizard brain

Of course, your first impression could be wrong.

As social psychologist Dr. Leslie Zebrowitz states:

“We seem unable to inhibit this tendency [to make quick judgments] even though it can lead to inaccurate impressions […] and has significant social consequences.”

We’re talking about consequences like:

Judicial decisions.

Financial success.

And even election outcomes

Similarly, a study conducted by Todorov and Jenny M. Porter found that even minor, random variations in images of the same person resulted in different inferred personality impressions from their participants.

So they saw faces like this:

Similar expressions but different impressions

And for each face, they identified if the person looked like a mayor, a consultant, a villain, etc.

(You can find actual photos, etc from the study here: Todorov, A., & Porter, J. (2014). Misleading First Impressions. Psychological Science, 25(7), 1404-1417.)

In his book, Todorov shares his insights:

“What appearance-influenced voters are doing is substituting a hard decision with an easy one. Finding out whether a politician is truly competent takes effort and time. Deciding whether a politician looks competent is an extremely easy task. Appearance-influenced voters are looking for the right information in the wrong place, because it is easy to do so.”

What’s happening here is simple:

We’re looking for the easy button.

And just like that wrong snap judgment you made about that guy with the  resting bitch face (who now happens to be your best friend), you can just as easily form a wrong first impression of a website.

But unlike that friend, you probably won’t give that website a second chance.

Because in the case of your copy on a website’s home page, “wrong” usually means a visitor bouncing or (worse) a missed lead or sale.

Is our first impression of a website really that similar to our first impression of a person? 

In short, yes.

A recent study researching the speed at which we form opinions about a web page’s visual appeal concluded that we will assess this within 50 ms.

And this study confirms that the judgments made during our first impression of a website do in fact influence our perceptions of credibility and trust.

Much like our ability to draw inferences from facial appearances, our first impression of a website is also comprised of a complex process that quickly accesses a variety of components. Many of them are design, but your copy also plays a part.

If we consider that most users leave a web page in the first 10 to 20 seconds, the implications become quite clear. As Jakob Nielsen puts it:

“To gain several minutes of user attention, you must clearly communicate your value proposition within 10 seconds.”

The necessity for a clear value prop in your hero section isn’t news.

How to ensure your copy is making the right first impression: copy validation

Usability analyst Craig Tomlin suggests that there are three pieces of critical information a new visitor should be able to answer:

  1. Who are you?
  2. What product/service do you provide?
  3. What’s in it for me?

Likewise, Peep Laja of ConversionXL suggests that your first impression should communicate:

  • Where the visitor is
  • What they can do there
  • Why they should do it

As well as:

  • Your brand personality (chic, silly, sexy, savvy, smart, classic, etc.), and
  • Your differentiating factor (what makes you different from the competition)

So, where does the five second test fit into all of this?

In his book The UX Five-Second Rules, Paul Doncaster says the advantages of the five-second testing method include:

  • Speed
  • Efficiency
  • Portability
  • Flexibility
  • Simplicity
  • Convenience

(Those advantages were music to my ears the first time I read them.)

And while Doncaster notes that the original reason for this test was to simply confirm that the purpose of a content page was obvious, this testing form can also be used for bigger, more critical website components.

Like the hero shot of your homepage.

And he notes that, because we’re testing an “in the moment” response, you don’t need to have access to a bunch of existing customers with prior knowledge of the product or service you’re selling. It’s all about visual perception and short-term memory.

So, given what we know about the seemingly uncontrollable snap judgments our brain makes on our behalf that influence our behaviors and decisions, the five second test simply provides an opportunity to receive feedback on the information a viewer is gathering during those first critical moments.

And I repeat: you don’t need to be a user testing expert to start running these tests.

In a nutshell, the five second test is a type of survey methodology – you’re going to be asking questions and gathering responses.

That’s not so hard, right?

It’s basically like a really teeny tiny version of a customer interview. But with anonymous strangers. And copy that’s in development.

But here’s the thing:

Just because you’re sending your copy out into the wild for validation does not mean it has to be “ready” or “perfect.”

(Heck. It doesn’t even have to be done.)

This is about innovation. And it’s about trying to solve problems (hopefully without creating new ones).

So pull out that long list of value prop options, and choose a few standouts to test. Because we’re going to use an iterative design process to quickly gather feedback and continue writing.

The goal here is to improve through iteration… not just document all of its flaws.

So don’t get hung up on perfection.

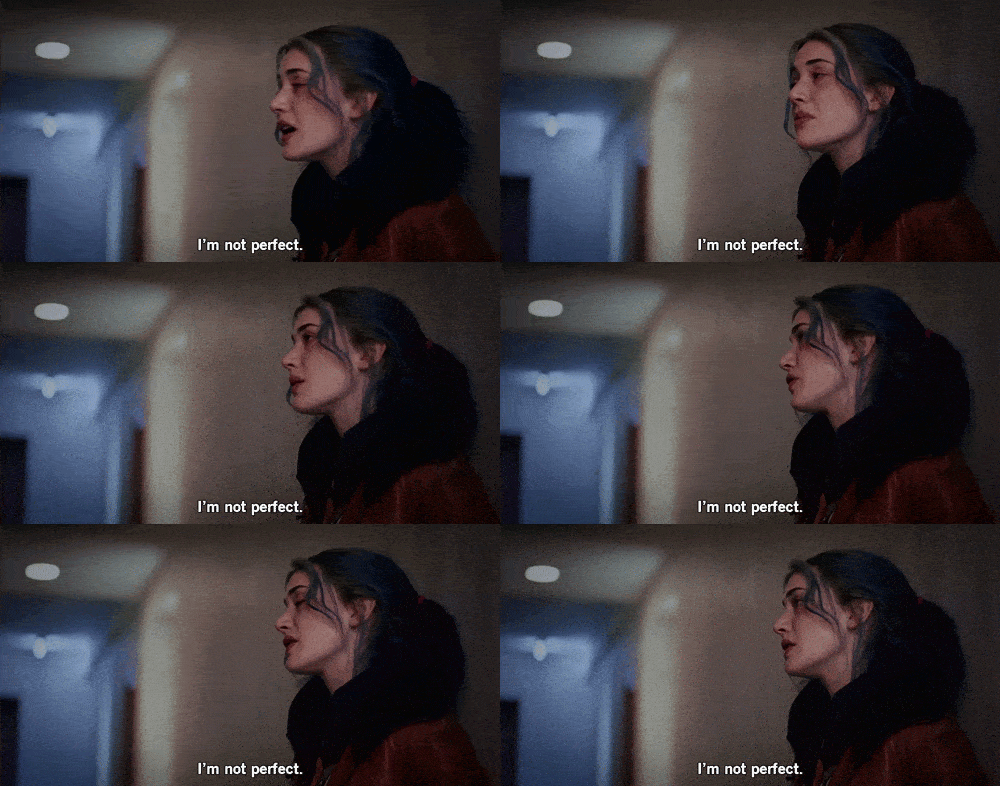
(And, yes. I realize that is so much easier said than done. This is why you’re going to see some of my less-than-perfect tests below. Hi, my name is Carolyn and I’m getting comfortable being vulnerable.)

image5

(If Kate Winslet can admit it, I can too.)

But, as with other testing methods, this test has limitations.

“When all you have is a hammer, everything starts to look like a nail.”

Five second tests aren’t always the perfect solution.

Similar to the way we form a first impression when we see a human face, in a five second span we are able to take in a lot of information… but may not necessarily be able to make sense of it. As Doncaster writes:

“A participant may take in a lot of information perceptually, but likely does not have time to make much sense of it as a whole entity, resulting in feedback that is limited in scope.”

In understanding the limits of a five-second test, you’ll be able to set up a test that effectively supports your learning goals.

A five second test can’t tell you everything.

And though this is perhaps obvious, it’s not the right tool to choose when the question you’re trying to answer requires more than five seconds of thought or consideration.

Hint: This means that body copy is not a good fit for this method of testing.

Where the five second test fits in your R&D tool belt

Conversion copywriters, this is where it gets particular important for you.

Five second tests are a great tool to add to your research-and-discovery tool belt for the simple fact that they allow you to focus on the first touchpoints between your copy and your audience.

And, as data analyst Tomi Mester notes in the article linked above, it’s worth mentioning that you’re not looking for statistically significant results here. You’re looking for insights that can help you form an educated guess. And steer you away from bad ideas dressed in sheep’s clothing.

And while Doncaster notes that homepages were originally “off limits” for this testing method, I would argue that because we’re testing an “in the moment” response, homepage hero shots and value props are ideally suited to this type of testing. Because this portion of your website is so critical to a visitor’s first impression of a website – and by extension of the company. Not to mention the success of the overall website as a whole.

So the five second test becomes an opportunity to:

  • Settle an internal bar where you have a team or internal stakeholders that have strong opinions about which approach they think is best
  • Gather intel about how clearly your copy is communicating an aspect of your desired message
  • Check the memorability of said message
  • Check the clarity of said message
  • And help guide your selection between value prop versions to begin validating before your copy goes live (or even graces your client’s desk)

Sure. You could wait to run A/B tests on your live copy (if traffic and conversion rate allow).

But why start with an experiment, with all its costs and risks, when you can first validate? Once you’ve validated a message, THEN split-test it.

The five second test offers immediate feedback and a chance to ditch poor performers – and test variations that may tank – before they cost you leads or sales.

How To Set Up Your Five Second Test So You Know Your Copy Is More Likely to Work

Here’s the step-by-step approach that I, a conversion copywriter who relies heavily on data and has run dozens of these tests, use when running 5-second tests:

  1. Select copy for testing
  2. Define testing goals
  3. Select the right 5 second test format
  4. Write the test
  5. Run the test
  6. Process the results
  7. Determine next steps
  8. Rinse and repeat (as necessary)

Now assuming you’re interested in running tests like these, here’s a breakdown of what to do at each step.

1. Select your copy for testing

For the purposes of ensuring a good first impression, you’ll want to choose copy placed at first touchpoints between you and your reader.

Me? I use this method primarily for testing homepage value prop copy.

While first impressions come from more than just headline copy, it’s already been noted here on Copyhackers that your value proposition is second only in importance to the visitor’s motivation for landing on your site in the first place.

With this in mind, it makes sense to test the clarity of your value prop’s first impression within the context of the hero shot.

As Joanna says:

“Visitors to your site need to be told what’s unique or different about you that they’d really like.”

With our gauge on likeability beginning to form during those first few milliseconds, ensuring the clarity of your homepage copy messaging (which is likely to be a version of your value prop) becomes all the more critical.

Because here’s the thing:

Ensuring that your value prop is making a good first impression will improve your chances for success (i.e., reducing bounce).

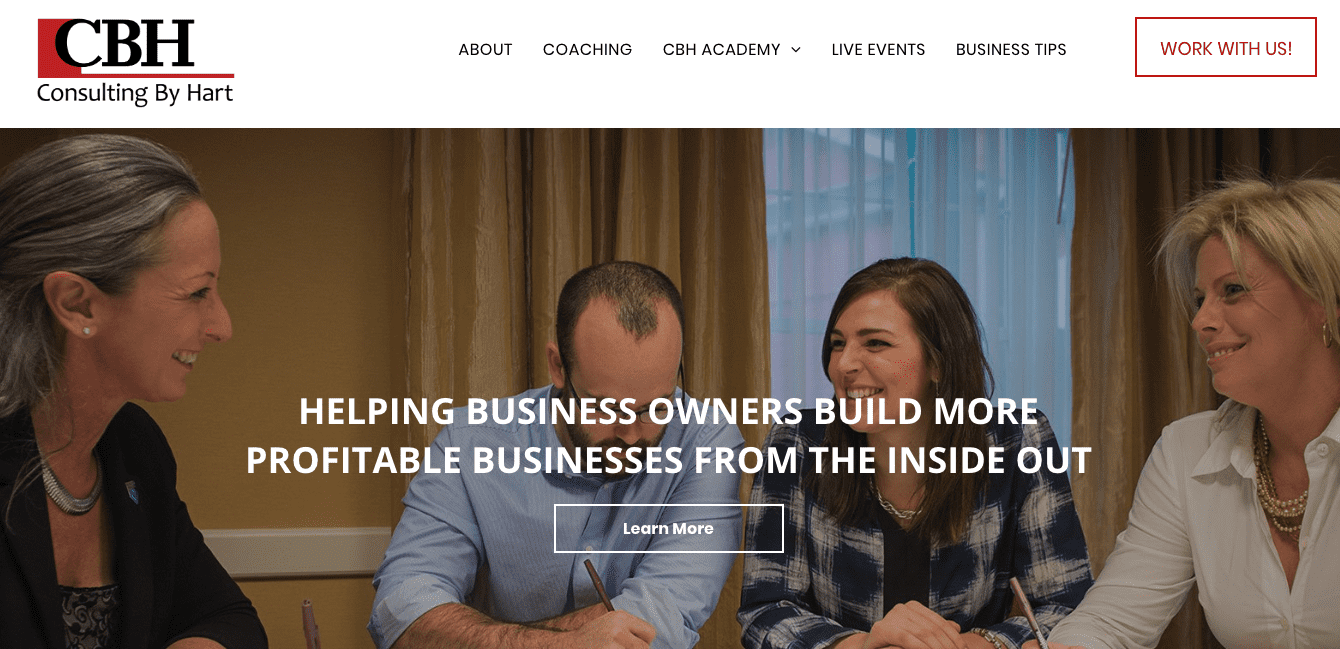
Running a series of five second tests helped me write this homepage hero copy: 7 Consulting by Hart live

The results? A 63.51% drop in page bounces.

Remember: good first impression = improved chances for success.

Other “First Impression” Copy Elements You Could Try Testing

  • Landing page headlines
  • Sales page headlines
  • Any other headline you might be working on
  • Facebook ads
  • Instagram ads
  • Adwords ads
  • Email subject lines

2. Define your testing goals

In the wise words of Lewis Carroll:

“If you don’t know where you are going, any road will get you there.”

Similarly, if you don’t clearly define why you’re testing and what you’re hoping to learn, it’s unlikely that you’ll gather the results you’re looking for.

(More importantly, you risk wasting time and money.)

In the context of making a good first impression, you’ll most likely be defining your testing goals as one of the following:

  1. Is my value prop memorable?
  2. Is my value prop clear?

Tip: If you’re stuck on defining a testing goal, look to the 5 critical points of a USP and headline scorecard. Your low-scoring criteria becomes low-hanging fruit for testing.

3. Select the right five second test format

Based on your defined testing goal, you’ll select a test type.

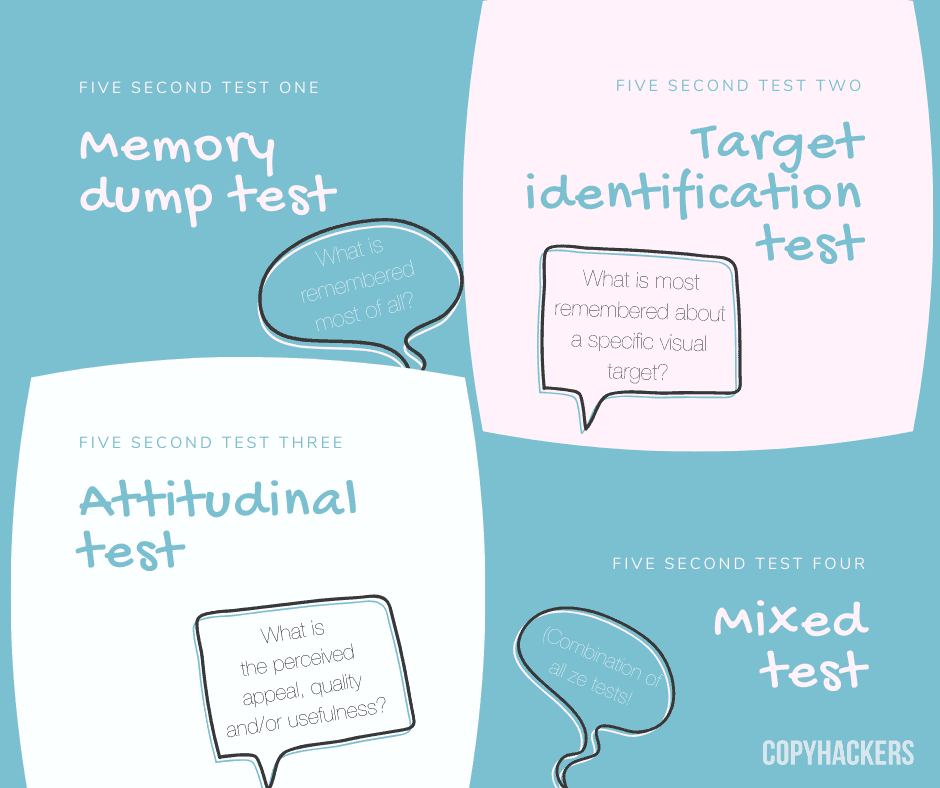
Doncaster outlines the following four test formats:

  1. Memory dump test (i.e., what is most remembered overall)
  2. Target identification test (i.e., what is most remembered about a specific visual target)
  3. Attitudinal test (i.e., perceived appeal, quality and/or usefulness)
  4. “Mixed” test (i.e., combining aspects of the previously mentioned types of tests)

Four five second tests Copyhackers

Could your five second test succeed without defining a test type? Maybe.

But in doing so, you largely leave the results of your test up to chance.

Defining your test format not only helps you more clearly align your learning goals with your results, but it also helps you write a better test.

You don’t need to overthink this. Here are some guidelines to help you choose your test format:

  • Want to gain insights about the memorability of your value prop? Choose memory dump.
  • Want to gain insights about the clarity of your value prop? Choose memory dump or target ID.
  • Want to gain insights about the emotional response you’re eliciting? Choose attitudinal.

You’ll notice I didn’t mention the “mixed” test. Here’s why:

As Doncaster notes, it’s simply more difficult to create a solid “mixed” test and, by default, more difficult to gather useful insights.

Not impossible. But more difficult.

So in the interest of saving budget and working to eliminate non-responses, your best bet is always to stay within one test format. With that in mind, your rule of thumb should be:

One goal = one test format

4. Write your test

Just so you know, this is where most five second tests fail.

There are two critical written components to your test (aside from the copy you’ll be testing):

  1. Your welcome screen
  2. Your test questions

Doncaster’s book sets forth his testing rules based on the analysis of over 300 public online five second tests. Of the eight “violations” listed, five of them were concerned with the writing of the test.

Here are some best practices to keep in mind as you write:

1. Your welcome screen: keep it simple

This is the screen that your test participant will see immediately before viewing your test image. It’s at this point that you’re setting the stage for what’s to follow.

While this is certainly an important moment in your participant’s journey through your test, you can (and should) keep this simple.

Just like your value prop, your instructions should be clear, concise and specific. Here are some examples pulled from Doncaster’s rules, organized by test format:

Sample Memory Dump Test Welcome Screen:

“You will have 5 s to view the [image]. After, you’ll be asked a few short questions.”

“You’ll see a screen for 5 s. Try to remember as much as you can about what you see.”

Or, the basic UsabilityHub.com welcome screen message:

“Look at the interface for 5 seconds and remember as much as you can.”

image6

Important: At the time of writing, UsabilityHub.com (my chosen five second test tool) limits custom welcome screens to researchers with a paid monthly membership. 

Sample Attitudinal Test Welcome Screen:

“You will have 5 s to view the [image]. After, you’ll be asked a few short questions about your reaction to the [image/design/message].”

“You’ll see a screen for 5 s. Pay attention to the general appeal of the [image/design/message].”

“After viewing the [image/design/message] for 5 s, you’ll be asked about your opinions on its look and feel.”

Sample Target Identification Test Welcome Screen:

If you are planning to only ask questions about one element among an image with many elements:

“You will have 5 s to view the [image]. After, you’ll be asked a few short questions about the [specific target being assessed].”

That said, if you’re hoping to understand whether the specific target is easily identifiable within the full design:

“You’ll see a screen for 5 s. Pay close attention to the [image/design/message].”

“After viewing the [image/design/message] for 5 s, you’ll be asked about your opinions on its look and feel.”

A word of warning:

Be careful that the information provided on the welcome screen doesn’t prime your users’ responses.

For example, if your welcome screen reads:

“Imagine you’re assessing companies that provide house cleaning services. You’ll see a screen for 5 s. Try to remember as much as you can about what you see.”

And then your first question reads:

Q1. What service does this company provide?

Well, you’ve primed the users response by tipping them off about what they’re about to see in the instructions. In turn, this will bias your results and waste the moment when your user’s memory is most clear. So don’t do that.

And on the topic of writing questions:

2. When it comes to your test questions, less is more

First things first: there’s no magic number for how many questions you ask.

That said, in the case of five-second tests, less is more.

The trace decay theory helps to explain the memory fade taking place in your participant’s short-term memory bank. Simply put, unless the information being transmitted is rehearsed, the short-term memory can only hold that information for 15 to 30 seconds before it begins to decay and fade away.

With this in mind. it’s best to ask the least number of questions possible to answer your research question and satisfy your learning goal. The original test questions used by Perfetti included only two questions:

  1. Recall as much as you can remember about the design.
  2. What is the purpose of the page?

In his book, Doncaster notes that of the 300+ tests he analyzed, 80% asked three or more questions. While most five second test tools cap out at five questions, know that you don’t need to max out your question capacity.

Doncaster makes a strong case for the “less is more” approach:

“In five-second tests, the acts of reading, understanding, and responding to questions place additional burden on the cognitive process in play, which contribute further to memory fade.”

Only ask what needs to be asked to satisfy your learning goals.

Lesson Learned: It’s not just about the number of questions, it’s also about their order

The final questions on your five second tests are like the (questionable) leftovers in the back of your fridge: A little fuzzy and likely to elicit an “I dunno” response. 🤷🏻‍♀️

image7

We’re going to look at one of my very early five second tests.

My goal was to improve the clarity of communicating Consulting by Hart‘s services.

One of the issues with the existing copy that we identified during the initial project scope was that visitors couldn’t clearly identify the intended audience. As in, when it came to answering the question “Am I in the right place?” visitors may not confidently answer “yes.” The five second test run on the control hero shot helped us confirm this.

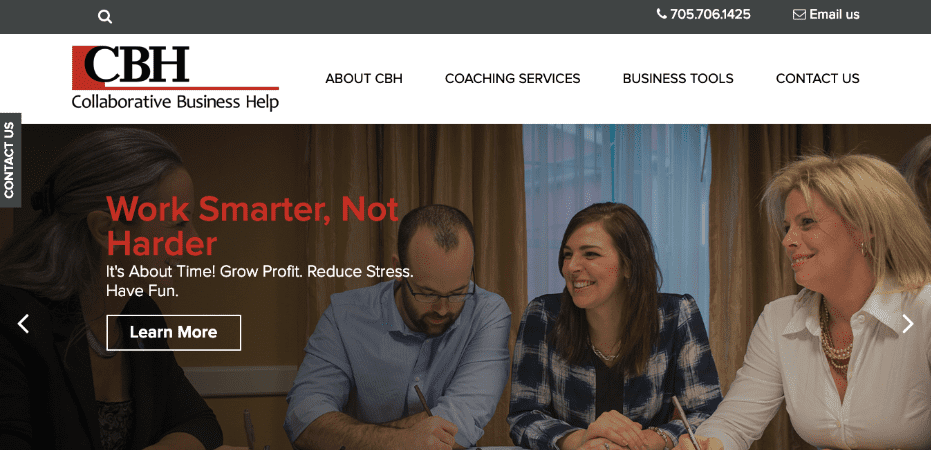
Here’s the control hero shot:

Screen Shot 2019 11 26 at 11.50.30 AM

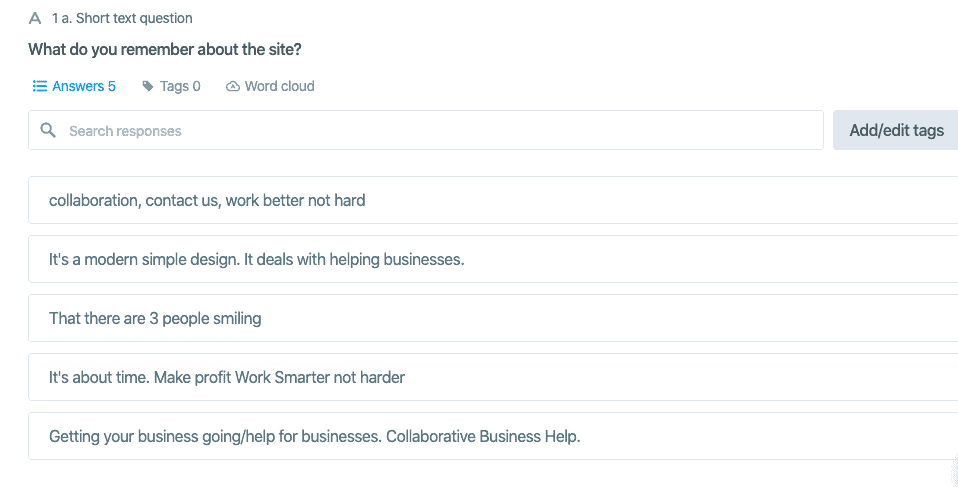
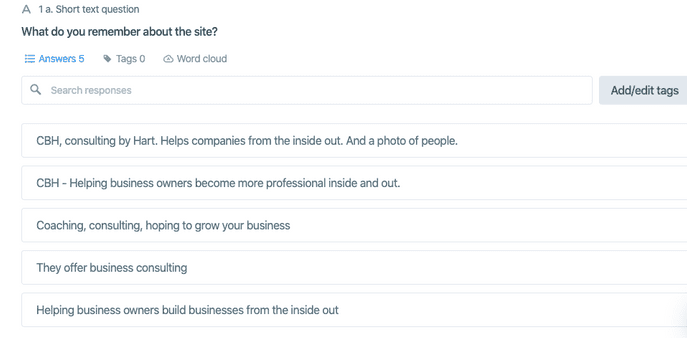
We started by asking them this question: “What do you remember about the site?”

And here’s a look at the results to Q1:

image8

My goal was to shine a spotlight on the services provided.

My original question order for this series of tests was:

Q1. What do you remember about the site?

Q2. What can you do on this site?

Q3. Who is this site for?

Q4. What is the name of their business? 

Notice any issues here?

For starters, Q4 doesn’t tie to the testing goal.

I also learned, through the gathered responses, that Q3 was open to misinterpretation. Some of the respondents interpreted this particular question as meaning “Who is this site representing?” or “Who is the company that this site is for?”

But the biggest issue?

Some of the most specific questions were asked at the end of the test. While the end results gathered were still promising (60% of the participants identified the name of their business correctly), this did leave my test with an increased vulnerability to participant non-responses.

Your solution: Ask the questions requiring the most specific memory recall first.

Your participants’ memories will be most clear immediately after your testing image disappears. From there, your participants’ short-term memories will begin to fade.

Doncaster dubbed this the “reverse-Polaroid effect” and noted that writing with this effect in mind helps you combat the “I don’t know” or “I don’t remember” responses.

If I were to do-over this test today I would rewrite those questions to look something like this:

Q1. What is the service or product this company provides?

Q2. What else do you remember about the image?

Here’s why:

Because the goal was to improve the clarity of the offer, I’ve removed all of the questions that do not specifically tie back to that goal.

And because the test is structured in a memory dump format, you’ll notice that I’ve now re-ordered the remaining questions according to specificity. This allows me to capitalize on the test taker’s memory when it’s strongest.

Finally, I’ve tweaked the wording of these questions to make my ask a little clearer. And adding the “else” in Q2 allows the participant to dump anything else they felt was memorable.

TL;DR: Think carefully about the questions you ask and the order in which you ask them. Order questions from most specific to least specific.

5. Run the test

You’re done the pre-work. Now it’s time to unleash your test on the public!

Here’s the step-by-step method to follow:

1. Load-in your test

If you haven’t already done so, you’ll need to choose your five second testing tool.

I like UsabilityHub.com because it allows you to pay a small fee for platform-recruited test-takers. Meaning you don’t have to bug your friends, family, mom or colleagues to take your test.

(It’s free to bring your own participants to your UsabilityHub test, but it still doesn’t open up the option to write your own instruction screen.)

If you’re bringing your own participants, you may want to consider UserBob. It allows you to set up a test with a custom instruction screen and then pushes your test taker toward your chosen survey tool (like Typeform).

Lesson Learned: Choose your visual context carefully

You have a couple of choices when it comes to presenting your copy to your test takers:

  1. Test copy on a blank screen
  2. Test copy in a wireframe
  3. Test copy by editing copy on the existing site using an editor extension

(We’re going back to one of my first wireframed tests. I’m sweating.)

As previously mentioned, my goal on this project was to improve the clarity of the services my client provided.

Here’s that wireframed copy:

image9

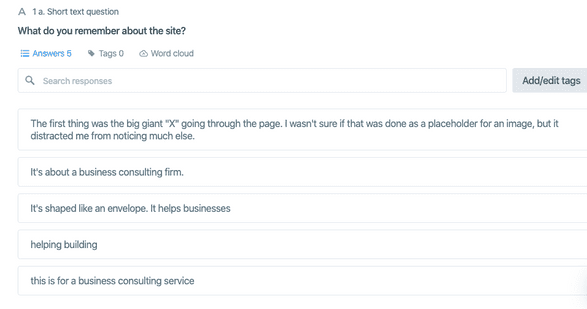
And here are some of the lacklustre answers I received to the first question:

image10

Highlights include:

“The first thing was the big giant “X” going through the page.”

“It’s shaped like an envelope.”

Not exactly the great-first-impression-confirming insights I was hoping for. Womp, womp.

It wasn’t that the answers as a whole were completely unusable, but it became immediately apparent that my very lo-fi wireframe spoiled the results.

The solution: Test your copy in a visual context that isn’t going to distract your participants.

Here’s the thing:

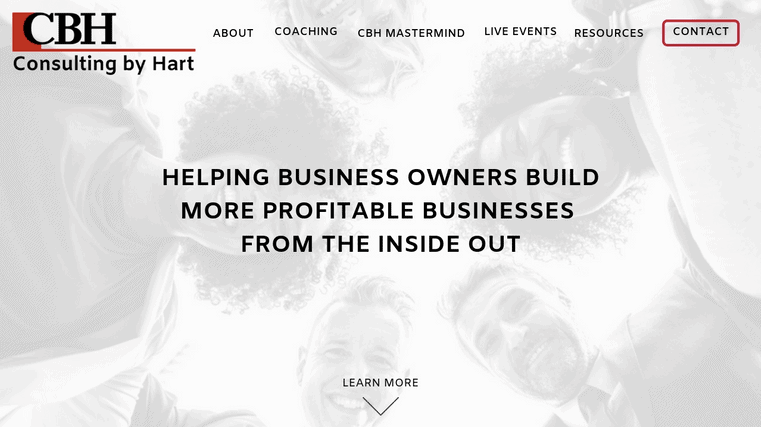
Those spoiled results were entirely my fault. And I knew it as soon as they landed in my inbox. So I went back to the drawing board to try again. This time I tested my copy in a wireframe that actually resembled a website:

image11

And the resulting answers were decidedly more focused:

image12

Unsurprisingly, improving the visual context for the copy improved the overall quality of the answers I received from participants.

TL;DR: Choose your visual context with care. I like running tests on my copy in context because that’s how a new visitor will actually experience it. If you decide to run your wireframes, make sure they look as much like a website as possible.

2. Set your audience demographics

This step is only required if your testing tool will recruit participants on your behalf.

Your gut will tell you to narrow down the participant demographics as much as possible. The common thinking here is that you’ll receive more qualified feedback if you set your demographic filters to match your target audience.

Stop. Do not pass go. Do not collect $100.

image13

Yes, validating your copy with your market is important.

But this isn’t the time for that.

This is about first impressions. Is the message clear? Is the message memorable?

That’s it.

You don’t need your testing participants to be carbon copies of your one reader. You just need them living in the same (figurative) neighborhood. Why? Because most demographic data doesn’t help you understand your typical visitor’s behavior.

Within your testing dashboard you’re likely to see at least some of the following options to filter your audience:

  • Language
  • Viewing device
  • Country
  • Gender
  • Age range
  • Education level
  • Employment status
  • Annual household income
  • Technical proficiency
  • Daily hours online

Of these options, I focus first on behavioral indicators, like education level, employment status, technical proficiency and daily hours online.

I also set the viewing device filter. This helps ensure that the participant is viewing my image in the correct visual context – i.e. I don’t get participants viewing a desktop hero shot image on a mobile device.

Depending on the project, I might also set the language settings to English. I’ve found that this can help protect my test results from increased “I don’t know” or “I don’t remember” responses from participants that might have English as a second (or third) language.

Bottom line: Skip the granular “female, aged 25-34” details and focus on big-picture behavior-driving demographics instead.

3. Set your audience size

This was one of the biggest questions I had when I first started using this testing method in my writing process.

The jury is out on the “perfect” audience size for testing:

  • Virzi says 3-5
  • Perfetti says 20
  • Faulkner says 10
  • Turner et al. says 7
  • And Nielsen says 5

After reviewing the research, I think that Nielsen’s suggestion of five is the sweet spot for our purposes.

Here’s why:

Nielsen suggests that your first five test participants will discover over 80% of all problems.

I won’t get into the specifics of Nielsen and Landauer’s formula (you can find that formula as well as the their graph demonstrating diminishing returns as new participants are added here), but usability experts do seem to agree that simple tests require fewer test takers.

Sticking with five test takers also helps you make the most of your testing budget. As Nielsen states:

“Doesn’t matter whether you test websites, intranets, PC applications, or mobile apps. With 5 users, you almost always get close to user testing’s maximum benefit-cost ratio.”

Granted, this decision is based on usability studies, not studies specifically relating to copy. But the fact remains that our use of the five-second test qualifies as “simple,” so using Nielsen’s rule of thumb works.

And, as Nielsen also suggests, from a cost-benefit perspective, you’re better to run plenty of small iterative tests than one large test.

I’ve experimented with larger audience sizes, but keep coming back to five participants.

Here’s why five is the magic number:

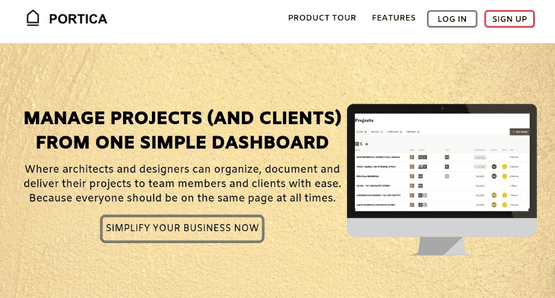
During my work with Portica, a project management tool built specifically for architects and designers, its founder mentioned how he felt they were missing the mark in effectively communicating how they differed from more widely adopted document storage solutions. They weren’t really a document storage solution, but their existing messaging didn’t clearly articulate the full scope of what it is they actually offered.

I decided to double my typical testing audience size on this particular project because we were limited to only a small handful of customer interviews. That meant that my VoC data was drawn largely from raw mining research and founder interviews. I felt that a slightly larger audience pool might help confirm whether or not I was on the right track with their new messaging.

Here’s round one, version one:

image14

And here’s round one, version two:

image15

What I found as I toggled in and out of the audience filters on my completed results surprised me.

The filtered responses of smaller response pools remained consistent with the full audience results.

4. Preview your test

This little step can save you from wasting time and money on a faulty test.

Here’s a quick checklist to help you run quality assurance (QA) on your test:

  • Welcome Screen
    • Are your welcome screen instructions clear, concise and specific?
    • Have you unintentionally primed your test taker with leading instructions that you should revise / remove to minimize bias?
  • Testing Image
    • Is your testing image fully visible without scrolling?
    • Does your testing image display your copy in a visual context that accurately represents the way in which a reader would experience it? For example, if you’re testing homepage hero copy, does your testing image resemble a hero shot??
    • Is there anything in your testing image that has the potential to distract your test taker?
  • Test Questions
    • Are your questions clear, concise and specific?
    • Are your questions in the right order for your learning goals?
    • Have you unintentionally primed your test taker with leading questions?
    • Are there any questions that are unnecessary in helping you satisfy your learning goal? (If so, remove them.)

This step takes about a minute total to complete:

image16

But that minute can save you from wasting budget on a problematic test. Don’t skip it.

5. Let your test run

Arguably the easiest part of the process: hit submit and wait.

If you’ve opted to have your testing tool recruit participants on your behalf, you can typically expect your complete results in the next 5 to 45 minutes.

Go grab a coffee, your work here is done (for now).

image17

6. Process your five-second test results

Your results are in! It’s time to get back to work.

There are a couple of different ways you can go about processing the results.

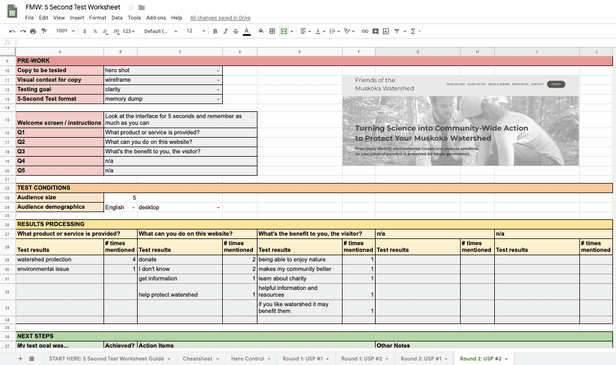
While the easiest and quickest way is to review your results inside your test dashboard, I prefer to process results in a Google sheet (you can find that template here) in order to have a full picture of my control and USP iterations as I work through my projects.

image18

Inside that worksheet I note down my pre-work decisions, test conditions and any demographic filters placed. Once I receive my results, I begin making my notes and tallying repetitions in language used by the test users (similar to Ashley Greene’s method demonstrated during this Tutorial Tuesday).

If you’re anything like me, I’m sure you’re wondering:

How will I know if my results are “useful”?

I’m a firm believer that you can learn from all of your results.

Receiving non-responses like “I don’t know” or “I can’t remember” is a signal to head back to the drawing board and try again.

Likewise, if you receive a set of responses that indicate you’ve achieved your goal, that also becomes useful (and handy to report back to your client).

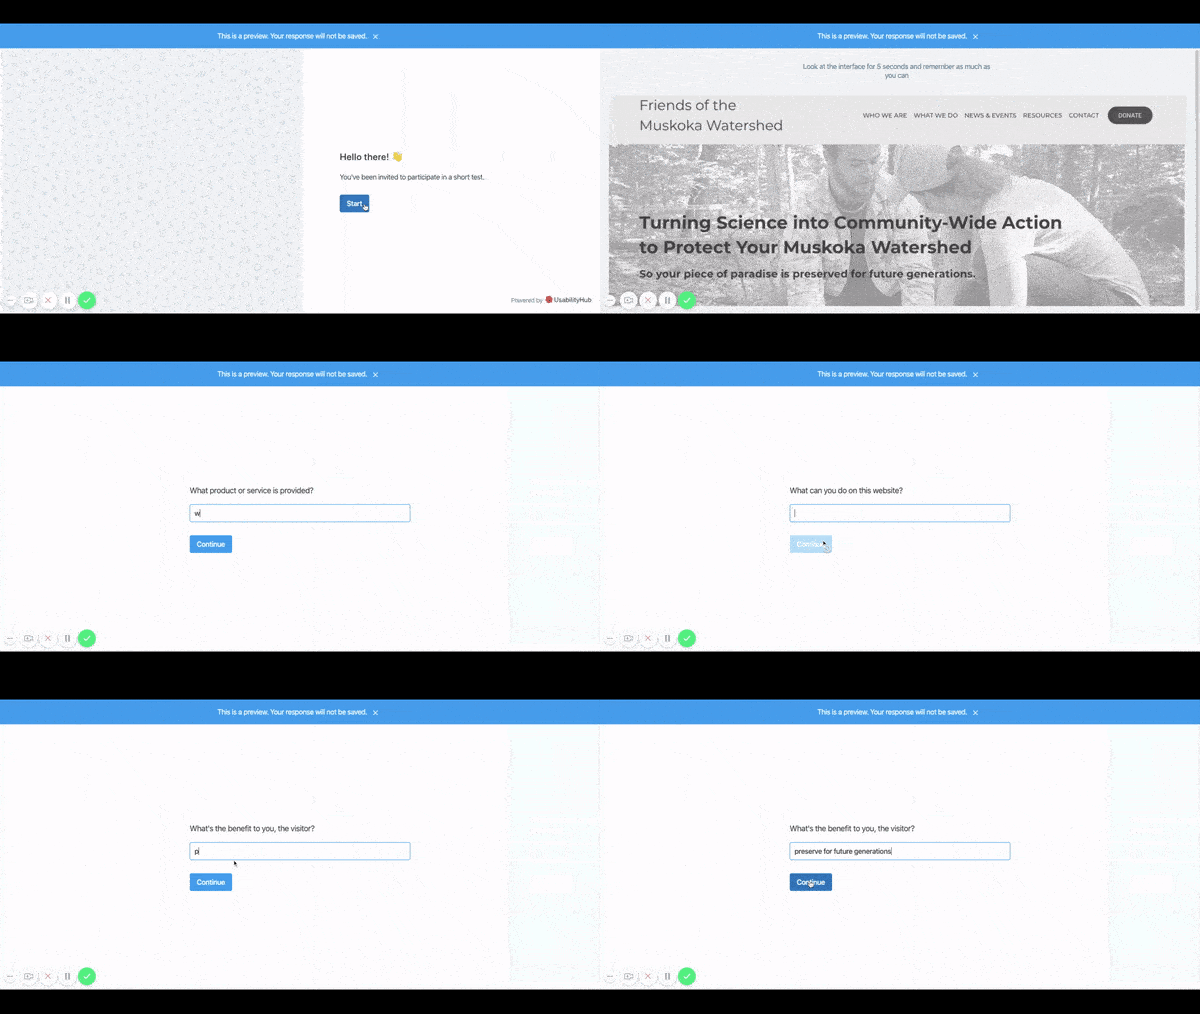
For example, watershed protection and preservation organization Friends of the Muskoka Watershed came to me asking for snappy copy that articulated their rather complex mission and methodology in a way that is easy to understand.

I first confirmed their hunch about general audience confusion during the homepage hero control five-second test (as well as audience interviews and reviewing traffic flow through Google Analytics).

I then found, through various research activities, that their “science to action” methodology was particularly attractive to their target audience and was also a key differentiator between them and their competitors.

From there I worked up a variety of customer-facing options and began testing.

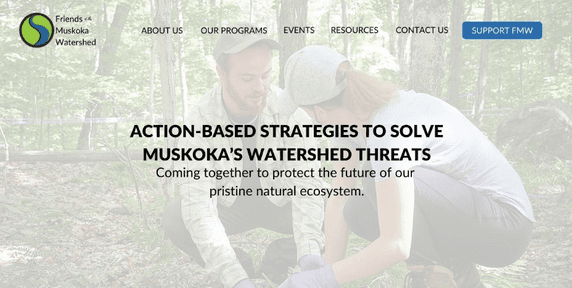
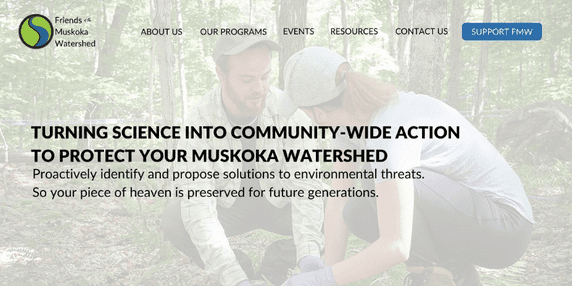
Here were the wireframe images I started with:

First the “snappy” version:

image19

Followed by the longer version:

image20

What I found?

Only 20% of the “snappy” version test takers understood their core mission – protecting the Muskoka watershed.

Compare that to 60% of the longer version test takers.

These results supported my recommendation for longer copy. And I continue to develop and test this copy as we move toward a finalized project.

7. Determine your next steps

Did your shift in messaging help you achieve your learning goals?

  • Yes? Great. Move forward feeling more confident in knowing that your copy is communicating what it needs to communicate in those first five seconds of a visitor landing on the site.
  • No? Also great! Head back to the drawing board with that intel to continue working on your value prop.

Use those findings to inform future iterations of your copy.

8. Rinse and repeat those five-second tests often (and when necessary)

In the wise words of Eugene Schwartz:

“Copy is not written. Copy is assembled.”

An engineer wouldn’t release a new product without testing it, right? You are an engineer of words. Testing should be built into the process of assembling.

As Nielsen says:

“After creating the new design, you need to test again. Even though I said that the redesign should “fix” the problems found in the first study, the truth is that you think that the new design overcomes the problems. But since nobody can design the perfect user interface, there is no guarantee that the new design does in fact fix the problems. 

A second test will discover whether the fixes worked or whether they didn’t. Also, in introducing a new design, there is always the risk of introducing a new usability problem, even if the old one did get fixed.”

Everywhere he says “design,” replace it with copy.

I’m feeling a little like a broken record at this point, but here goes:

Your five-second tests are experiments.

Test early. Test often. And don’t let that perfection monster rear his ugly head!

image21

Test your copy before you think it’s perfect.

And maybe even before you think it’s “ready.”

I typically start testing two or three customer-facing value prop options during my initial research and discovery work (before I present my messaging recommendations report), simply because it allows me to present some initial results to help guide my client in understanding why my recommendations suggest that one direction might be better than the other.

And it allows me to validate what I might think of a good idea as unclear and improves my work along the way to finalized copy.

The end result?

Copy that is communicating key information clearly within those first critical moments of a visitor landing on a website.

The critical deciding factors in whether or not you should test should be:

  1. Do you know what you want to learn?
  2. Will displaying an image, with copy, for 5 seconds help you learn this?

If you answered yes to both of those questions, then you should start testing.

This all sounds great. But how do I get budget approval?

Easy. I build my five-second test budget into the fee for my project.

This is now a non-negotiable in my writing process. So I don’t ask for permission.

Of course, exact numbers depend entirely on the project in question, but with each test costing about $10 USD, I usually build a $50 to $70 internal “Five Second Test Fund” into each project.

But if you want to dig in and get started right now, remember this:

“The best results come from testing no more than 5 users and running as many small tests as you can afford.” – Jacob Nielsen

User testing tools aren’t just for user testing experts. To get started with improving your copy’s first impression, you just need to be ready to learn and have some copy to test.

It’s all part of the iterative process on your way to making that great first impression.

Author: Carolyn Beaudoin, conversion copywriter

Editor: Joanna Wiebe, founder of Copyhackers

Peer reviewer: Talia Wolf, founder of GetUplift

The post How to spot bad headlines before they make your visitors bounce – an intro to easy copy validation appeared first on Copywriting for startups and marketers.


from
https://copyhackers.com/2020/02/copy-validation/